Showing posts with label menu. Show all posts

Wednesday, May 20, 2015

Script: Washbasin AVsitter Plugin - Basic Edition

[Black Tulip] Washbasin - BASIC - AVsitter Plugin (Script for Designers)

(c) 2015 Auryn Beorn

Washbasin AVsitter Plugin basic edition script in Marketplace.

Thank you for having considered this script to enhance the quality of your products. Please read the following instructions carefully, especially the ones explaining which permissions to apply to the scripts for the next owner. Failure to complete this task INVALIDATES the license governing your use of this set of scripts. Should you have problems, please fill the scripts assistance form, explaining what you did and what happened, and I'll get back to you.

IMPORTANT!
The script contains a check to prevent accidental give-aways. If you haven't set permissions correctly in your inventory, then the script will self delete when you try to use it. The best way to ensure you set permissions correctly is by doing it NOW in your inventory.

TABLE OF CONTENTS


FEATURES


  • Water functions start/stop when an avatar sits/stands up from the object
  • You may have several prims with animated textures, each one having its own animation settings
  • Menu shows as an option under the AVsitter menu
  • Turn on/off the animated water texture effects when the user is sitting on the object
  • Define up to nine sounds that the final user can select via menu
  • Change the sound volume via menu
  • Go back to AVsitter's menu from the script's menu
  • Add up to SIX buttons to call other scripts
  • Menu timeout to reduce lag - no open listeners after timeout (0.001 ms script time when idle)
  • Final user can change access to owner only/everybody/group
  • Menu can be integrated into AVsitter & AVsitter 2 (It work under other systems, but please check notes)


STEP-BY-STEP SET UP: WHAT SCRIPT TO USE?


There is one copy/no modify/transfer script contained in your folder, that will work together with any AVsitter system that you may have installed:

[Black Tulip] Washbasin - BASIC - AVsitter Plugin

(The other script is just a sample to try out a feature - nothing that you would eventually use in a finished product.)


SETUP: CHANGE PERMISSIONS FOR NEXT OWNER


Check the following section on this page, knowing that each [Black Tulip] ASSET refers to the following script:

[Black Tulip] Washbasin - BASIC - AVsitter Plugin


STEP-BY-STEP SETUP: CHANGE THE PRIMS' DESCRIPTION


There are a few sample objects ready to help understand the stages to setup our object. Let's begin by rezzing the [Black Tulip] Washbasin - UNSCRIPTED SAMPLE object, and inspect it. It's made of two prims, their names being:

[Black Tulip] Washbasin - UNSCRIPTED SAMPLE
Cylinder for flowing water

The first prim listed is the root (a mesh washbasin), and the second listed prim is a regular SL-Cylinder, with some taper.


There are two prims because the animated water effect will consist in static water on the sink, plus the water falling from the faucet. We cannot have two different animated water effects in the same prim, so we need the secondary prim, the cylinder, for this.

For now, we'll just change the descriptions of the prims to something we'll say here. Once you've completed setting up the sample, please check the ANIMATED TEXTURE OPTIONS, IN DETAIL section, for details on the descriptions format.

Change the description of the root prim to:

water;3;4;4;10;2;0.6


and change the description of the cylinder prim to:

water;19;0;0;0.25;1;0.4


Got them?

Perfect. Now you can add AVsitter and some animations, and the following line in the AVpos notecard:

BUTTON [WASHBASIN]|-28640987

Or you can rez the next sample object, [Black Tulip] Washbasin - UNSCRIPTED SAMPLE/AVsitter in, which already has AVsitter installed, with a couple of sample poses and the AVpos notecard. We will continue by using this object.


STEP-BY-STEP SETUP: EDIT THE CONFIGURATION NOTECARD


Apart than turning water on/off, the script also allows to select one sound to play among several. The first one defined in the configuration notecard will be the sound to be played when the script resets. After that, final users can change this from the menu.

All this means that you have to define somewhere which sound options exist. We do this in the [Black Tulip] Washbasin - BASIC - AVsitter Plugin ~CFG~ notecard. Open the notecard included with your package, which should look like this as you open it:


(There's more text when you scroll down, but the one showing is relevant.)

Pay attention to these lines:

sound = Water 1 | [Black Tulip] Water Sounds - Sink #04
sound = Water 2 | [Black Tulip] Water Sounds - Sink #03
sound = Water 3 | [Black Tulip] Water Sounds - Flow #01
sound = Water 4 | [Black Tulip] Water Sounds - Flow #03
sound = Water 5 | [Black Tulip] Water Sounds - Flow #05
sound = Water 6 | [Black Tulip] Water Sounds - Flow #06

These lines define the buttons showing under the Sounds menu of the script. First, the name to show on the menu button, then, the name of the soundclip contained in the same prim where the script is. The exact format, together with all the options that can be set up in the notecard (like the extra buttons), is explained in the THE CONFIGURATION NOTECARD FORMAT, IN DETAIL section.

Once we have the [Black Tulip] Washbasin - BASIC - AVsitter Plugin ~CFG~ configuration notecard ready, we would drop it in the same prim where AVsitter is, then the soundclips (with permissions correctly adjusted) if we haven't done yet, and finally, the [Black Tulip] Washbasin - BASIC - AVsitter Plugin script.

There's a finished [Black Tulip] Washbasin - SCRIPTED sample object included, with all the configuration completed. You may want to check out this one if something along this process came out differently to you.

In the next sections, we discuss more details and advanced options, but with this step-by-step guide, you should have the basics to start setting up your own objects, now.


SETUP: ANIMATED TEXTURE OPTIONS, IN DETAIL


SETUP: THE CONFIGURATION NOTECARD FORMAT, IN DETAIL


SETUP: THE MAIN SCRIPT, AS A MODULE YOU CAN USE FROM ANOTHER SCRIPT


Although this script is designed with AVsitter in mind, because the [*To AVSit*] button will open up the AVsitter menu, the truth is that you can incorporate this script in any system that allows for linked messages. The [*To AVSit*] button is very specific, but you can open this menu from other scripts, like MLP.

Check the following section on this page, knowing that:

[Black Tulip] ***Script Name*** [MODULE] refers to [Black Tulip] Washbasin - BASIC - AVsitter Plugin
CODE_NUMBER is -28640987
NAME_ON_MENU is Washbasin

AVSitter line looks like: BUTTON Washbasin|-28640987
AVSitter 2 line looks like: ADJUST Washbasin|-28640987
MLP line looks like: LINKMSG Washbasin | 1,-4,-28640987,fromMLP

You have example AVpos and .MENUITEMS notecards with your purchase.


TROUBLESHOOTING


Q: I click the particle/animated texture options on the menu, but no visible outcome shows. What's going wrong?

A: Most likely, there's not a particles source/animated textures source defined in the object. Double-check the DESCRIPTION of the prim you expect to be a SL light point/particles source/animated texture.

Q: Particles are still not showing. What happens?

A: Check that you haven't deactivated particles visibility in your viewer.

Q: I hear no sound when I change the volume from the menu. What could be going wrong?

A: Make sure that there's a sound clip on the Content tab of the prim with the script.


For any other problem not described here, please give a complete description of your issue in the following online form.

I'll get back to you after I have read your report and replicated your issue inworld, according to your description of it. Please, be detailed.

-- Auryn Beorn

Script: Washbasin AVsitter Plugin - Full Edition

[Black Tulip] Washbasin - FULL - AVsitter Plugin (Script for Designers)

(c) 2015 Auryn Beorn

Washbasin AVsitter Plugin full edition script in Marketplace.

Thank you for having considered this script to enhance the quality of your products. Please read the following instructions carefully, especially the ones explaining which permissions to apply to the scripts for the next owner. Failure to complete this task INVALIDATES the license governing your use of this set of scripts. Should you have problems, please fill the scripts assistance form, explaining what you did and what happened, and I'll get back to you.

IMPORTANT!
The script contains a check to prevent accidental give-aways. If you haven't set permissions correctly in your inventory, then the script will self delete when you try to use it. The best way to ensure you set permissions correctly is by doing it NOW in your inventory.

TABLE OF CONTENTS


FEATURES


  • Water functions start/stop when an avatar sits/stands up from the object
  • You may have several prims with animated textures, each one having its own animation settings: There are two groups, for the script. Still water, and flowing water. The relevance is explained in the setup section.
  • You may also have several prims with one particles effect: it will be the same effect in all particles prims
  • Menu shows as an option under the AVsitter menu
  • Turn on/off the animated water texture, and particle effects when the user is sitting on the object - You can turn them on/off independently
  • Define up to nine sounds that the final user can select via menu
  • Change the sound volume via menu
  • Go back to AVsitter's menu from the script's menu
  • Add up to THREE buttons to call other scripts
  • Menu timeout to reduce lag - no open listeners after timeout (0.001 ms script time when idle)
  • Final user can change access to owner only/everybody/group
  • Menu can be integrated into AVsitter & AVsitter 2 (It work under other systems, but please check notes)


STEP-BY-STEP SET UP: WHAT SCRIPT TO USE?


There is one copy/no modify/transfer script contained in your folder, that will work together with any AVsitter system that you may have installed:

[Black Tulip] Washbasin - FULL - AVsitter Plugin

(The other script is just a sample to try out a feature - nothing that you would eventually use in a finished product.)


SETUP: CHANGE PERMISSIONS FOR NEXT OWNER


Check the following section on this page, knowing that each [Black Tulip] ASSET refers to the following script:

[Black Tulip] Washbasin - FULL - AVsitter Plugin


STEP-BY-STEP SETUP: CHANGE THE PRIMS' DESCRIPTION


There are a few sample objects ready to help understand the stages to setup our object. Let's begin by rezzing the [Black Tulip] Washbasin - UNSCRIPTED SAMPLE object, and inspect it. It's made of three prims, their names being:

[Black Tulip] Washbasin - UNSCRIPTED SAMPLE
Cylinder for flowing water
box for particles splash

The first prim listed is the root (a mesh washbasin), the second listed prim is a regular SL-Cylinder, with some taper, and the third prim is just a box, for the particles effect.


There are three prims because the animated water effect will consist in static water on the sink, plus the water falling from the faucet, and then we have the particles prim. We cannot have two different animated water effects in the same prim, so we need the secondary prim, the cylinder, for this. We could use the slice end property of the cylinders to get a cylinder that serves us both as particles source and prim for animated texture: think about how as a building exercise. To keep things simple, we're using a separate prim for particles.

For now, we'll just change the descriptions of the prims to something we'll say here. Once you've completed setting up the sample, please check the ANIMATED TEXTURE OPTIONS, IN DETAIL section, for details on the descriptions format.

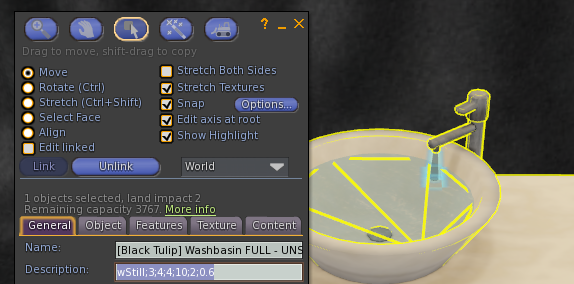
Change the description of the root prim to:

wStill;3;4;4;10;2;0.6


the description of the cylinder prim to:

wFlow;19;0;0;0.25;1;0.4


and the description of the particles prim to:

particles


Got them?

Perfect. Now you can add AVsitter and some animations, and the following line in the AVpos notecard:

BUTTON [WASHBASIN]|-28640987

Or you can rez the next sample object, [Black Tulip] Washbasin FULL - UNSCRIPTED SAMPLE/AVsitter in, which already has AVsitter installed, with a couple of sample poses and the AVpos notecard. We will continue by using this object.


STEP-BY-STEP SETUP: EDIT THE CONFIGURATION NOTECARD


Apart than turning water and particles on/off, the script also allows to select one sound to play among several. The first one defined in the configuration notecard will be the sound to be played when the script resets. After that, final users can change this from the menu.

All this means that you have to define somewhere which sound options exist. We do this in the [Black Tulip] Washbasin - FULL - AVsitter Plugin ~CFG~ notecard. Open the notecard included with your package, which should look like this as you open it:


(There's more text when you scroll down, but the one showing is relevant.)

Pay attention to these lines:

sound = Water 1 | [Black Tulip] Water Sounds - Sink #04
sound = Water 2 | [Black Tulip] Water Sounds - Sink #03
sound = Water 3 | [Black Tulip] Water Sounds - Flow #01
sound = Water 4 | [Black Tulip] Water Sounds - Flow #03
sound = Water 5 | [Black Tulip] Water Sounds - Flow #05
sound = Water 6 | [Black Tulip] Water Sounds - Flow #06

These lines define the buttons showing under the Sounds menu of the script. First, the name to show on the menu button, then, the name of the soundclip contained in the same prim where the script is. The exact format, together with all the options that can be set up in the notecard (like the extra buttons), is explained in the THE CONFIGURATION NOTECARD FORMAT, IN DETAIL section.

Below that, you will find all the particles configuration. Ignore it for now: it is also explained in the THE CONFIGURATION NOTECARD FORMAT, IN DETAIL section.

Once we have the [Black Tulip] Washbasin - FULL - AVsitter Plugin ~CFG~ configuration notecard ready, we would drop it in the same prim where AVsitter is, then the soundclips (with permissions correctly adjusted) if we haven't done yet, and finally, the [Black Tulip] Washbasin - FULL - AVsitter Plugin script.

There's a finished [Black Tulip] Washbasin FULL - SCRIPTED sample object included, with all the configuration completed. You may want to check out this one if something along this process came out differently to you.

In the next sections, we discuss more details and advanced options, but with this step-by-step guide, you should have the basics to start setting up your own objects, now.


SETUP: ANIMATED TEXTURE OPTIONS, IN DETAIL


SETUP: THE CONFIGURATION NOTECARD FORMAT, IN DETAIL


SETUP: THE MAIN SCRIPT, AS A MODULE YOU CAN USE FROM ANOTHER SCRIPT


Although this script is designed with AVsitter in mind, because the [*To AVSit*] button will open up the AVsitter menu, the truth is that you can incorporate this script in any system that allows for linked messages. The [*To AVSit*] button is very specific, but you can open this menu from other scripts, like MLP.

Check the following section on this page, knowing that:

[Black Tulip] ***Script Name*** [MODULE] refers to [Black Tulip] Washbasin - FULL - AVsitter Plugin
CODE_NUMBER is -28640987
NAME_ON_MENU is Washbasin

AVSitter line looks like: BUTTON Washbasin|-28640987
AVSitter 2 line looks like: ADJUST Washbasin|-28640987
MLP line looks like: LINKMSG Washbasin | 1,-4,-28640987,fromMLP

You have example AVpos and .MENUITEMS notecards with your purchase.


TROUBLESHOOTING


Q: I click the particle/animated texture options on the menu, but no visible outcome shows. What's going wrong?

A: Most likely, there's not a particles source/animated textures source defined in the object. Double-check the DESCRIPTION of the prim you expect to be a SL light point/particles source/animated texture.

Q: Particles are still not showing. What happens?

A: Check that you haven't deactivated particles visibility in your viewer.

Q: I hear no sound when I change the volume from the menu. What could be going wrong?

A: Make sure that there's a sound clip on the Content tab of the prim with the script.


For any other problem not described here, please give a complete description of your issue in the following online form.

I'll get back to you after I have read your report and replicated your issue inworld, according to your description of it. Please, be detailed.

-- Auryn Beorn

Sunday, February 15, 2015

Script: Theme Texture Change - Materials & Basic

[Black Tulip] Theme Texture Change
&
[Black Tulip] Theme Texture Change - Materials
(Scripts for Designers)

(c) 2015 Auryn Beorn


Thank you for having considered this script to enhance the quality of your products. Please read the following instructions carefully, especially the ones explaining which permissions to apply to the scripts for the next owner. Failure to complete this task INVALIDATES the license governing your use of this set of scripts. Should you have problems, please fill the scripts assistance form, explaining what you did and what happened, and I'll get back to you.

IMPORTANT!
The script contains a check to prevent accidental give-aways. If you haven't set permissions correctly in your inventory, then the script will self delete when you try to use it. The best way to ensure you set permissions correctly is by doing it NOW in your inventory.

Because the materials and non-materials version of this script are so similar to setup, we'll document both in this page, referring to differences when they exist.

TABLE OF CONTENTS


FEATURES


  • Define as many texture themes as you need, grouped in the categories you need. They are stored in notecards, but UUIDs do not show in the notecards.
  • Menu timeout to reduce lag - no open listeners after timeout (0.001 ms script time when idle)
  • Final user can change access to owner only/everybody/group
  • Menu can be integrated into tools such as MLPv2, AVsitter... (AVsitter version 2 works too!)


SET UP: WHAT SCRIPT TO USE?


There are two scripts contained in your folder:

Materials version:

[Black Tulip] Theme Texture Change - Materials
[Black Tulip] Theme Texture Change - Materials [MODULE]

Non-Materials version:

[Black Tulip] Theme Texture Change
[Black Tulip] Theme Texture Change [MODULE]

We need to use ONLY ONE of them in a given product.

Which one? How to choose?

The [MODULE] version, as explained in the THE MAIN SCRIPT, AS A MODULE YOU CAN USE FROM ANOTHER SCRIPT section, will allow you to use this script integrated with other scripts that allow sending linked messages, such as the Multi Love Pose (MLP) or AVSitter for multiavatar, multianimation devices.

So, depending on what we need, we'll use the following script as main one:

Normal use - We want the menu to show when the object is clicked:
[Black Tulip] Theme Texture Change - Materials (Materials version)
[Black Tulip] Theme Texture Change (Non materials version)

The menu should show up after clicking a button from another script, like MLP, AVSitter:
[Black Tulip] Theme Texture Change - Materials [MODULE] (Materials version)
[Black Tulip] Theme Texture Change [MODULE] (Non materials version)

Once we've chosen the right main script, we have to set some descriptions in the primitives of the object, following the instructions below.


SETUP: CHANGE PERMISSIONS FOR NEXT OWNER


Check the following section on this page, knowing that each [Black Tulip] ASSET refers to the following scripts:

Materials version:

[Black Tulip] Theme Texture Change - Materials
[Black Tulip] Theme Texture Change - Materials [MODULE]

Non-Materials version:

[Black Tulip] Theme Texture Change
[Black Tulip] Theme Texture Change [MODULE]


SETUP: CREATING TEXTURE THEMES


You will need a full permissions object for this. That's why no sample has been included. Rez your full permissions object (permissions for next owner can and should be different!) If it looks like plywood at this moment, that is okay. We will make the screenshots starting with a plywood object too :-)


Your object may be just one prim, or several linked prims. It matters not. This does matter, though: those prims you want to be affected by the texture change routine... Change their description.

How should we change the description?

Let's look at the example object to get the first idea:


Pay attention to the description:

t;bed

That is, t; and then, bed. This means, t; indicates that the prim will react to texture changes. We can write the name we wish after that, but it's recommended to keep it short, and not to leave leading or trailing spaces around it. Also, do not repeat texts after t; If one prim has bed, then other prims shouldn't have bed as well.

(NOTE: Some of my scripts allow for multiple parts in the descriptions, separated by the # character. You can use the texture change script together with them, but the t; part needs to be the first one, always.)

Once all our prims have their description changed, following this simple rule, let's go for the next steps.

Edit the object, and drop the [Black Tulip] Theme Creator - Materials - AUXILIARY TOOL script in it ([Black Tulip] Theme Creator - AUXILIARY TOOL for the non-materials version).

Next, texture your object as you prefer.


and click for a menu.

Materials version shows:


And non materials version shows:


The difference is that the materials version shows an extra Create NoAlpha button. We'll explain what that extra button is for once we're familiar with the procedure.

Let's just click Create! for now.

This tells things in local (nearby) chat:


(The materials version outputs more text than the non materials version, for it adds all the normal, specular and alpha mode information.)

What do we do with those lines?

We save them in a notecard, as tidy as we can. We can leave the timestamp lines if we want, but the notecard will read faster if we remove them.

IMPORTANT NOTE: Because of deciding on a different base name for the notecards and forgetting to change that in the script, the local chat says something about a BT_THEME notecard. That's not correct. It should say something about a BT_TEXTURE notecard. Please keep this mind, so you're not confused about the notecard name! The correct base name is BT_TEXTURE. Apologies for this typo.

Notecard with timestamps:


Notecard without timestaps:


IMPORTANT: If you leave the timestamp line without the opening bracket delimiting the time, the textures will not be read correctly. For example, if instead of this timestamp line:

[19:19:19] My Sample Object to test scripts:

we remove the initial [ character and leave something like this (which can happen easily when copying/pasting from chat):

19:19:19] My Sample Object to test scripts:

or this:

My Sample Object to test scripts:

the textures will not be read correctly.

If unsure, then remove entirely the timestamp line and leave only the texture data, as shown on the above "Notecard without timestamps" picture.


Does this notecard need a specific name? It does. It needs to begin, always, by BT_TEXTURE. Then we write : and then, the name we want for our theme. For example, we can call this notecard BT_TEXTURE:Bed 0. That means, Bed 0 will show up as a menu option, once we're done.

If we change our mind about how this theme should look like, all we have to do is change the texturing, and again, click the Create! button, then replace the notecard content.

What if we add prims later, but that don't have any t; parts in their description? Then you're good to go. What if those prims have any t; parts in their descriptions? We texture and again click Create!, then replace the notecard content.

Let's create another theme, this time, calling the notecard, BT_TEXTURE:Bed 1, for a Bed 1 option on the menu.


With these two theme notecards, we're ready to try out our texture change script! Click one more time for the menu, select [*DELETE*] and then confirm:


The object is now ready for the theme texture change script.


PREPARING OUR FINISHED OBJECT


Now that we've deleted the auxiliary script, we begin by editing our object and dropping the theme notecards in it:


Then we add the corresponding script to the object (depending on if Materials version, or not, if [MODULE], or not):


And when we click on the object, there they show: the buttons that will apply the stored texture choices, when clicked.


Easy!

NOTE: Actually, we can drop the theme texture notecards at any time, without having to reset the script. The script will silently reload the list to rebuild the menus.


TEXTURE CHANGE OPTIONS, IN DETAIL


Now that we've seen how easy it is to create themes and have them added, let's explore in detail what else we can do, and how.

The first thing we're going to learn is how to create submenus of options.

The allowed notecard names for this script should begin by BT_TEXTURE, then followed by the : character, as we've already seen when creating our first theme notecard. Then we write something, and that something shows up as a menu button.

For example, we've written:

BT_TEXTURE:Bed 0
BT_TEXTURE:Bed 1

and that made for two buttons to show on the main menu: Bed 0 and Bed 1

If we're creating more themes for the complete bed, but then we want also themes only for the bed cover, we may want to have these Bed 0, Bed 1, etc... under a Bed submenu. How do we do that?

Simply renaming the notecards to this:

BT_TEXTURE:Bed:Bed 0
BT_TEXTURE:Bed:Bed 1

will make for it.

Notice how now we have a Bed submenu:


and when we click, the Bed 0 and Bed 1 options show. The menu also tells us that we're inside the Bed submenu:


In order to give clues to our users, as to whether they will be applying a final texture, or will be entering a submenu, we can rename the notecards this way:

BT_TEXTURE:Bed *:Bed 0
BT_TEXTURE:Bed *:Bed 1

and have the buttons show this way (I've added two more theme notecards to show the difference):


We can create nested submenus by simply separating the names with the : character. This implies, the : will never be part of a menu/theme name. We're limited into how many submenu levels we can use by the notecard length name, which is 63. If we use short names, we'll be able to nest more submenus than if we use long names.


Now, let's suppose that we want to create a texture theme, but we would like that some faces of the involved prims remain unchanged.

Just drop the included [Black Tulip] Theme Texture Change - Texture to Ignore texture on the faces that should not be included as part of a theme. Click on Create!, and notice how the information for those faces isn't output, then save the content to a theme notecard.


When we use this theme, the cover won't change its texture. We can exclude as many faces as we need.

Remember this: Only those prims having their description to begin by t; and your text choice, will be acknowledged as prims that will have their texture changing. The other prims will not be a part of the themes.

We can recreate themes at any time. We can link, unlink, recreate in case of doubt... The auxiliary tool is pretty flexible, thanks to the t; part of the description of the involved prims.


And, to finish with the extra options... What's the Create NoAlpha button for, in the materials auxiliary tool?

This option is to help bypassing a current bug in the viewers. When ALM (Advanced Lighting Mode) is on, because of this bug, we may notice that non-alpha textures will show as alpha anyway, having the annoying Open GL alpha bug to happen (this alpha bug isn't related to SL but to the used graphics library, Open GL).

If all of your textures being part of a theme are completely flat, then use this option, Create NoAlpha, instead of Create! It will cause for a specific value to be set to 0.

If we have a mix of alpha and non alpha textures, and/or transparency settings, then use Create!, and make sure of setting to 0 a specific value of the texture lines corresponding to that texture and face. If you don't know how to obtain a face number, then click here.

Observe the highlighted number 1 almost at the end of the two lines that have all the information for that texture face, having two | characters around. When your texture is flat, when it is not alpha, that 1 should be set to 0 instead.


We will have to do this manually if our object presents a combination of alpha-non alpha textures and/or transparency options. The bug may not necessarily happen with all the textures, but it's better to be aware of this and how to bypass it.

This, of course, affects only to the materials version. The non-materials version doesn't even have the Create NoAlpha button.


SETUP: THE MAIN SCRIPT, AS A MODULE YOU CAN USE FROM ANOTHER SCRIPT

Check the following section on this page, knowing that:

[Black Tulip] ***Script Name*** [MODULE] refers to [Black Tulip] Theme Texture Change - Materials [MODULE] (Materials version) or [Black Tulip] Theme Texture Change [MODULE] (Non materials version)
CODE_NUMBER is -1864098
NAME_ON_MENU is Texture

AVSitter line looks like: BUTTON Texture|-1864098
MLP line looks like: LINKMSG Texture | 1,-4,-1864098,fromMLP

You have example AVpos and .MENUITEMS notecards with your purchase. Remember that this works too with AVSitter 2.

IMPORTANT: If you want the texture menu under the [ADJUST] menu of AVsitter 2, then the line to write is:

ADJUST Texture|-1864098

or

ADJUST [Texture]|-1864098

or any other writing you prefer for it.


TROUBLESHOOTING


Q: When I'm using the auxiliary tool and click Create!, no texture information is output. What could be happening?

A: Make sure that the description of the prims that should be affected by the texture theme, begins by t; and then the text you want (but try to keep it short.) The auxiliary tool only outputs information when the description begins by t;


For any other problem not described here, please give a complete description of your issue in the following online form.

I'll get back to you after I have read your report and replicated your issue inworld, according to your description of it. Please, be detailed.

-- Auryn Beorn
Sunday, December 14, 2014

Script: Candles - Animated Texture Edition

[Black Tulip] Candles - Animated Texture Edition (Script for Designers)

(c) 2014 Auryn Beorn

Candles - Animated Texture Edition script in Marketplace.

Thank you for having considered this script to enhance the quality of your products. Please read the following instructions carefully, especially the ones explaining which permissions to apply to the scripts for the next owner. Failure to complete this task INVALIDATES the license governing your use of this set of scripts. Should you have problems, please fill the scripts assistance form, explaining what you did and what happened, and I'll get back to you.

IMPORTANT!
The script contains a check to prevent accidental give-aways. If you haven't set permissions correctly in your inventory, then the script will self delete when you try to use it. The best way to ensure you set permissions correctly is by doing it NOW in your inventory.

TABLE OF CONTENTS


FEATURES


  • Start/Stop at the same time:
    • Candle flames
    • Sound
    • Light (SL light point)
  • Start/Stop independently the effects listed above when the global effect is ON
  • Change the light color, radius, intensity and fall off of this SL-light point.
  • Change the sound volume.
  • Personalize the SL light point colors to show on the menu, in the configuration notecard.
  • Add up to three extra buttons to call other scripts.
  • Menu timeout to reduce lag - no open listeners after timeout (0.001 ms script time when idle)
  • Final user can change access to owner only/everybody/group
  • Menu can be integrated into tools such as MLPv2, AVsitter... (AVsitter version 2 works too!)

NOTE: It is NOT mandatory to add a sound. The included sample object, indeed, has no sound clips at all.


SET UP: WHAT SCRIPT TO USE?


There are two scripts contained in your folder:

[Black Tulip] Candles - Animated Texture Edition
[Black Tulip] Candles - Animated Texture Edition [MODULE]

We need to use ONLY ONE of them in a given product.

Which one? How to choose?

The [MODULE] version, as explained in the THE MAIN SCRIPT, AS A MODULE YOU CAN USE FROM ANOTHER SCRIPT section, will allow you to use this script integrated with other scripts that allow sending linked messages, such as the Multi Love Pose (MLP) or AVSitter for multiavatar, multianimation devices.

So, depending on what we need, we'll use the following script as main one:

Normal use - We want the menu to show when the object is clicked:
[Black Tulip] Candles - Animated Texture Edition

The menu should show up after clicking a button from another script, like MLP, AVSitter:
[Black Tulip] Candles - Animated Texture Edition [MODULE]

Once we've chosen the right main script, we have to set some descriptions in the primitives of the object, following the instructions below.


SETUP: CHANGE PERMISSIONS FOR NEXT OWNER


Check the following section on this page, knowing that each [Black Tulip] ASSET refers to the following scripts:

[Black Tulip] Candles - Animated Texture Edition
[Black Tulip] Candles - Animated Texture Edition [MODULE]


SETUP: EXAMINING THE SAMPLE OBJECT


With this script, you may control the following:

  • One light point
  • As many animated-texture flames as you could need

We'll understand better what this means by examining the [Black Tulip] Candles - SCRIPTED SAMPLE object. Rez it, and let's follow this explanation.

First of all, click it to get the menu. You'll see, as soon as you select ON/OFF to start all the effects, that the flames show and are animated, the sound is on (if there's a sound and the selected volume isn't Off, of course :-) ) and the SL light emits. But there it is only one prim that will be the SL light point.

How is this done? Let's examine the object. Right click the sample object to edit it, then click the "Content" tab. When we do this, we're inspecting the contents of the ROOT PRIM. You should see:

  • The [Black Tulip] Candles - Animated Texture Edition script
  • The [Black Tulip] Candles - Animated Texture Edition ~CFG~ configuration notecard
  • A sample script, [Black Tulip] Particle Snow Example for Buttons, which is absolutely not necessary to make your flames work. It's included to illustrate how to add extra buttons with extra functionality, but by all means remove it and the associated entry menus in your own objects.

What does this mean?
That all the necessary assets, this is, candles script, the configuration notecard, and soundclip if any, have to be dropped into the ROOT PRIM. This is the default when we simply right click an object, then select "Edit" from the menu.

Having this clear, now let's examine the sample object in detail. It consists of four linked prims: different candlesticks and candle setups, all of them prepared to hold texture animated flames. Right click to edit, click "Edit linked", and now:

  • Inspect the root prim, which should be the three candles on a plate with an adornment. This is the SL-light point.
  • Inspect now the description of this prim. It says:

candleFlame;3;4;4;15;2#light

  • This means, this prim contains animated candle flames, and is also the SL-light point. Later we go in more detail about how the description is built exactly.
  • Inspect now any of the other child prims (they will highlight in blue). Inspect the description. It says:

candleFlame;3;4;4;15;1

  • This means, each of these prims will have animated textures. Later we go in more detail for this.

Now that we've inspected the object, let's study the details of the descriptions format.


SETUP: FORMAT OF THE DESCRIPTIONS


To tell the script which of the linked primitives are relevant (particle effects, animated texture effects or SL-light point), we have to write specific words (CASE SENSITIVE) in the DESCRIPTION of each primitive (DESCRIPTION - not the name, don't confuse them!)

The format of the descriptions is as follows:

parameter

or

parameter1#parameter2

It doesn't matter the order the parameters are written, as long as a # character separates them.

As we've seen, when inspecting the sample object, the following parameter-keyword would indicate that the prim is a SL-light point:

light

There is another possibility (explained below): animFire.

If we want a primitive having, for example, animated candle flames, and being at the same time a SL light point, then we write the:

candleFlame;3;4;4;15;2#light

combination. The # character will separate parameters, and it does not matter the order we choose to write the parameters.

This:

light#candleFlame;3;4;4;15;2

would have the same effect.


The possible descriptions this script recognizes are:

Expected description for a light point: light
Expected description for animated-texture flames: candleFlame (there's more to this one, explained next)

Set the DESCRIPTIONS according to these simple rules, drop the main script and the configuration notecard in your linked object, and your object is ready to go!

NOTE: Setting the description for the animated-texture candle flames takes a little more work. We explain this now.

Animated candle flames in SL are often created by animating a texture, which consists of a texture containing different "frames" of the fire animation (we call this "cell animation")

Whenever we want an animated texture, we have to tell the script:

  • The type of texture animation
  • The speed (low numbers for a slow animation, high for a faster animation)
  • In which face the animation should play (or if it should play in all the faces at once)

Apart from this, when we want a cell animation, the script needs to know how many vertical frames (we call this x) and how many horizontal frames (we call this y) the texture contains.

To avoid entering into technical details that may confuse at this point, let's just see the description format when we want animated textures as flames, and then a very common example that, most likely, will be the one you will use :-)

General format:

candleFlame;code_for_animation_type;x;y;speed;face

candleFlame
This is the code word for the script. Write it as is. Case sensitive!

code_for_animation_type
We're using cell animation in this case, so: 3

x
For cell animation: we type here how many VERTICAL frames the animation has

y
For cell animation: we type here how many HORIZONTAL frames the animation has

speed
Here we type the frames per second to show for this cell animation

face
-1: The animation will be applied to ALL THE FACES of the prim
face_number: The animation will be applied to the face face_number of the prim (you type here the face number!)

EXAMPLE


candleFlame;3;4;4;9;-1

This is a cell animation (code 3) having x = 4 vertical frames, y = 4 horizontal frames. The speed is 9 frames per second. It will show in face -1, which is the code for ALL THE FACES of the prim.

(Why just one or all faces? This is a scripting limitation. The animated texture can work only in all faces at once, or in just one of them. If you hear otherwise than one-or-all at once, it's true that there's a trick, but it's not a reliable one, and may get "fixed" by LL at any time!)


THE CONFIGURATION NOTECARD


The configuration notecard is named [Black Tulip] Candles - Animated Texture Edition ~CFG~, and it allows us to:

  • Write comment lines, for our own clarifications. Comment lines always begin with a # character.
  • Define what colors we want to be shown as menu options. for the SL light point.
  • Define which extra buttons we want to add to the menu, to call other scripts from them, having a maximum of 2 buttons.

With the exception of comment lines, all of the other lines have the structure:

parameter = value

The accepted parameter keywords are:

soundIn here, we specify the name of a soundclip that will sound when the SL light point turns on, if any
buttonIn here, we decide which extra buttons will show up in our menu, and what other scripts they will call

Now, let's explain how the values are written and what they mean.

lightColor = button_label|color_code

The SL light point may have a color we specify. There's a submenu entry, L.Color, that will show a list of colors we define in the notecard. We define the colors by specifying, separated by the | character, what name should show on the menu, and the actual color code for that menu entry.

What text will show on the menu button?
That is button_label in the notecard line.
IMPORTANT: It should not have more than 24 characters.

How do we write the color code? Check HOW TO WRITE THE COLOR CODE and examine the configuration notecard with the examples.


button = button_label|link_msg_number|link_prim|text_to_send|show_menu_again

This one is a little more complicated, and it is only required if you plan to add extra buttons that call other scripts. Skip this part if you are not doing this for now, making sure that no button lines are in the configuration notecard.

In order to "call", "execute" or "launch" another script from our main script, we have to use a communication mechanism called linked messages. This is a mechanism that allows scripts to send messages to other scripts in the same linked object, and to listen to possible messages coming from other scripts in the same linked object.

When we use a button line, it means that it will add a button on the menu. This button menu, upon click, will SEND a message to ANOTHER SCRIPT that could be in ANY of the prims of our linked object. That another script should be listening, and will expect to know from us:

A code number that should be specified in the script documentation. That is link_msg_number in the notecard line.
A message. That is text_to_send in the notecard line.
A UUID. The barbeque controller script sends the UUID of the avatar having clicked the menu.
If the main menu should show up after executing the action. That is show_menu_again in the notecard line. We type there 0 if the menu should not show up after the action, and we type 1 if the menu should show again after the action. To better understand this, check what happens when clicking the example Snow Red, Snow Green and Stop Snow do. Snow Red and Snow Green show the candles menu again after calling the particles script: if you check the configuration notecard, they have a value of 1 for show_menu_again. When clicking Stop Snow, the candles menu doesn't show. If you check the configuration notecard, it has a value of 0 for show_menu_again.

Apart from this, the main script needs a couple more data items to know about:

What text will show on the menu button?
That is button_label in the notecard line.
IMPORTANT: It should not have more than 24 characters.

To what primitive this message is being sent.
That is link_prim in the notecard line.

Unless your application has very specific requirements, this link_prim code will be one of the following, meaning:

1This will send the message to the root prim IF our object consists of more than one prim linked (Or there's an avatar sitting on a single-prim item)
-1This will send the message to all prims in the linked object
-2This will send the message to all prims BUT the one containing the SENDER (this controller) script
-3This will send the message to all child prims (that is, all prims BUT the root prim)
-4This will send the message to the prim where the SENDER (this controller) script is in (-4 could be seen as the opposite code of -2)

Please check the documentation of the other scripts you wish to send linked messages from this one, to make sure of how exactly you should write the line. The lines explained above are the generic ideas valid for every script accepting linked messages, but this documentation cannot replace any other script's documentation for their own interface. Check with the creator of the other script how this should be done.


SETUP: THE MAIN SCRIPT, AS A MODULE YOU CAN USE FROM ANOTHER SCRIPT

Check the following section on this page, knowing that:

[Black Tulip] ***Script Name*** [MODULE] refers to [Black Tulip] Candles - Animated Texture Edition [MODULE]
CODE_NUMBER is -38640983
NAME_ON_MENU is Candles

AVSitter line looks like: BUTTON Candles|-38640983
MLP line looks like: LINKMSG Candles | 1,-4,-38640983,fromMLP

You have example AVpos and .MENUITEMS notecards with your purchase. Remember that this works too with AVSitter 2.


TROUBLESHOOTING


Q: I click the light/animated texture options on the menu, but no visible outcome shows. What's going wrong?

A: Most likely, there's not a light source/animated textures source defined in the object. Double-check the DESCRIPTION of the prim you expect to be a SL light point/particles source/animated texture.


Q: I hear no sound when I change the volume from the menu. What could be going wrong?

A: Make sure that there's a sound clip on the Content tab of the prim with the script.


For any other problem not described here, please give a complete description of your issue in the following online form.

I'll get back to you after I have read your report and replicated your issue inworld, according to your description of it. Please, be detailed.

-- Auryn Beorn

Monday, November 10, 2014

Script: Coffee House Sign Switch

[Black Tulip] Coffee House Sign Switch (Script for Designers)

(c) 2014 Auryn Beorn

Coffee House Sign switch script in Marketplace.

Thank you for having considered this script to enhance the quality of your products. Please read the following instructions carefully, especially the ones explaining which permissions to apply to the scripts for the next owner. Failure to complete this task INVALIDATES the license governing your use of this set of scripts. Should you have problems, please fill the scripts assistance form, explaining what you did and what happened, and I'll get back to you.

IMPORTANT!
The script contains a check to prevent accidental give-aways. If you haven't set permissions correctly in your inventory, then the script will self delete when you try to use it. The best way to ensure you set permissions correctly is by doing it NOW in your inventory.

TABLE OF CONTENTS


FEATURES


  • Show the Open/Closed text by selecting on the menu.
  • Turn glow on/of when the open/closed text is visible.
  • Change the light color, radius, intensity and fall off of the SL-light point.
  • Menu timeout to reduce lag - no open listeners after timeout (0.001 ms script time when idle)
  • Final user can change access to owner only/everybody/group


SETUP: CHANGE PERMISSIONS FOR NEXT OWNER


Check the following section on this page, knowing that each [Black Tulip] ASSET refers to the following script:

[Black Tulip] Coffee House Signs - Switch


SETUP: EXAMINING THE SAMPLE OBJECT


With this script, you may control the following:

  • One light point
  • One prim that should have at least two different faces, one to show the Open text, the other one to show the Closed text

We'll understand better what this means by examining the [Black Tulip] Coffee Sign - SCRIPTED SAMPLE object. Rez it, and let's follow this explanation.

Right click the sample object to edit it, then click the "Content" tab. When we do this, we're inspecting the contents of the ROOT PRIM. You should see:

  • The [Black Tulip] Coffee House Signs - Switch script

What does this mean?
That the script has to be dropped into the ROOT PRIM. This is the default when we simply right click an object, then select "Edit" from the menu.

Having this clear, now let's examine the sample object in detail. It consists of two linked prims: a mesh neon sign having both the Open and Closed texts, in separate faces (only one will show, but with the menu you can see the other one) and a white, regular box, which is the root prim. Right click to edit, click "Edit linked", and now:

  • Inspect the root prim. It only contains the script.
  • Inspect the mesh sign prim.
  • Inspect now the description of this prim. It says:

sign;2;0.1;0;3;0.1;0#light

There are two parts in this description, separated by the # character. This means, this prim will feature both effects (open/closed sign and SL light point).

Now that we've inspected the object, let's study the details of the description format.


SETUP: FORMAT OF THE DESCRIPTIONS


To tell the script which of the linked primitives are relevant (open/closed text effects, SL-light point), we have to write specific words (CASE SENSITIVE) in the DESCRIPTION of each primitive (DESCRIPTION - not the name, don't confuse them!)

The format of the descriptions is as follows:

parameter

or

parameter1#parameter2

It doesn't matter the order the parameters are written, as long as a # character separates them.

As we've seen, when inspecting the sample object, the following parameter-keyword would indicate that the prim is a SL-light point:

light

There is another possibility, which tells that the primitive contains the open/closed text (explained below): sign.

If we want to specify that a primitive is, at the same time, the open/closed text and a SL light point, then we write the:

sign;2;0.1;0;3;0.1;0#light

combination. The # character will separate parameters, and it does not matter the order we choose to write the parameters.

This:

light#sign;2;0.1;0;3;0.1;0

would have the same effect.


The possible descriptions this script recognizes are:

Expected description for a light point: light
Expected description for the prim containing the open/closed text: sign (there's more to this one, explained next)

When we type sign in the description, we have to add more information: what face contains the open text, what face contains the closed text, and which values of glow each of them have, when glow is turned on/off.

How do we do this?

First, we type sign, to indicate "this is the prim with the open/closed text". Then we type a semicolon. Then we type a number: the face number of the face with the open text (Click here if you don't know how to get the face number of a prim.) Then we type another semicolon. Then we type how much glow when glow is "on" for the open text (range is from 0 -no glow- to 1 -full glow-). Then, a semicolon. Then, how much glow when glow is "off" for the open text. Then, semicolon. Then, the face number of the face with the closed text. Semicolon. How much glow when glow is "on" for the closed text. Semicolon. Finally, how much glow when glow is "off" for the closed text.

The general format, perhaps easier to understand, is:

sign;openText_faceNumber;openText_glowONvalue;openText_glowOFFvalue;closedText_faceNumber;closedText_glowONvalue;closedText_glowOFFvalue

IMPORTANT: The order is relevant in this format! Do not type sign to the end, for example. Values are expected in that order.

So the following, in the sample object description:

sign;2;0.1;0;3;0.1;0

means:

  • sign indicates the prim has the open/closed text
  • The number 2 means that the open text is in face 2 of said prim
  • The number 0.1 next to it means that glow on the open text will be 0.1 when chosen to be ON
  • The number 0 next to it means that glow on the open text will be 0 when chosen to be OFF
  • The number 3 next to it means that the closed text is in face 3 of said prim
  • The number 0.1 next to it means that glow on the closed text will be 0.1 when chosen to be ON
  • The number 0 next to it means that glow on the closed text will be 0 when chosen to be OFF

Set the DESCRIPTIONS according to these simple rules, reset the script if needed, and your object is ready to go!


TROUBLESHOOTING


Q: I click the light options on the menu, but no visible outcome shows. What's going wrong?

A: Most likely, there's not a light source defined in the object. Double-check the DESCRIPTION of the prim you expect to be a SL light point. Make also sure that the light radius and intensity are not zero, by changing their values on the menu.


For any other problem not described here, please give a complete description of your issue in the following online form.

I'll get back to you after I have read your report and replicated your issue inworld, according to your description of it. Please, be detailed.

-- Auryn Beorn

Monday, November 3, 2014

Tool: Simple Teleport System

[Black Tulip] Simple Teleport System

(c) 2014 Sei Lisa, Auryn Beorn

Simple Teleport System, in Marketplace.

If you're planning on setting up a teleport system, and all of your destination locations have Teleport Routing set to Anywhere, the simplest solution might be the most effective and user friendly for your customers, and that is what this script offers to you. Set up an object that will be the teleport panel via a notecard, and you can rez copies of this object, already set up, at all places where you need your teleport board.

Please read the following instructions carefully. There's a sample object included to guide you through an example set up, so you can then set up your own teleport board. If the script isn't working as it should, please read first the Troubleshooting section of this documentation. If your problem isn't described there, then fill the following form, explaining exactly what you did and what happened, and I'll get back to you.

TABLE OF CONTENTS


FEATURES


IMPORTANT: You need Teleport Routing set to Anywhere in all of your destination locations, in order for this script to work.

  • Configure several teleport points, anywhere (each destination location requires the Teleport Routing setting specified above)
  • Each teleport point has owner only/group/everybody (all) access
  • Menu shows allowing the user to click the location and so being teleported to it
  • Location shows in private chat too (the text will not be seen by others, only by the avatar clicking)


SET UP: WHAT ELEMENTS DO I NEED FOR THIS SYSTEM?


You need three items to set up the teleport system:

  • An object that you will use as teleport board
  • The [Black Tulip] Simple Teleport System script
  • The [Black Tulip] Simple Teleport System ~CFG~ configuration notecard

Included with this package, there's a teleport board ready for up to EIGHT destinations, the [Black Tulip] Simple Teleport SAMPLE OBJECT object. You can use that one if you prefer so.

We will have to:

  • Type an identifier we choose in the DESCRIPTION field of the prims that contain teleport panels
  • Use that identifier in the configuration notecard, to define the teleport points

There can be more than one prim containing teleport panels. Make sure that each prim has a DIFFERENT description than the rest.


SETUP: EXAMINING THE SAMPLE OBJECT


Rez the [Black Tulip] Simple Teleport SAMPLE OBJECT object. Inspect it, and pay attention to the DESCRIPTION field of the prims.

The root prim has no description.
The prim with the teleport panels has the following description:

tp

This description, tp, will be relevant to the configuration notecard.

If you were working with your own teleport panel object, and you have more prims that will contain teleport destinations, this is what you have to remember: give each teleport prim an UNIQUE description.

For example, the following descriptions would be okay in different prims:

tp
tp1
tp2
tpMainArea

while the following ones would not be okay:

tp
tp1
tp1
tp2

because tp1 shows twice. Make sure your descriptions are UNIQUE in the same object.


SETUP: THE CONFIGURATION NOTECARD


The configuration notecard is named [Black Tulip] Simple Teleport System ~CFG~, and it allows us to:

  • Write comment lines, for our own clarifications. Comment lines always begin with a # character.
  • Define the teleport points: what prim, face (showing one panel) correspond to a specific location, and the access type.
  • Define a default text other than Would you like to: showing on the menu.

With the exception of comment lines, all of the other lines have the structure:

parameter = value

The accepted parameter keywords are:

TP
In here, we relate prim+face with a specific location and access type for it

txtMenu
In here, we define a text other than the default Would you like to: that shows on the menu.

Now, let's explain how the values are written and what they mean.


TP = Prim-Desc|Face-Number|Region Name|X|Y|Z|Access

We specify the definition of a teleport destination after the = sign after the TP key word. We have to write down a series of values and separate them with the | character. What do all those Prim-Desc, Face-Number, etc. mean?

Prim-Desc
The description we have written for a teleport prim

Face-Number
The face number of a prim showing a teleport panel to be clicked upon

Region Name
The region name of the destination location

X
The X coordinate of the destination location

Y
The Y coordinate of the destination location

Z
The Z coordinate of the destination location

Access
A number identifying the type of access:
  • 0: Everyone will get the teleport menu when clicking on that panel
  • 1: Only those with the group tag activated will get the teleport menu when clicking on that panel
  • 2: Only the owner of the object will get the teleport menu when clicking on that panel

We write ONE of this lines PER teleport destination. If you don't know how to obtain Region Name, X, Y and Z, check the following section, How to obtain the region data. In a moment we analyze the meaning of the lines in the included [Black Tulip] Simple Teleport System ~CFG~ configuration notecard. Before that, let's complete the notecard specification, with the other possible value.

txtMenu = Text to show on the menu

By default, the menu shows the Would you like to: text, and then the teleport link. If you would like a different text before the teleport link, write it after the = sign, and do NOT write in separate lines! All the text should be together on the same line. If you're fine with the default text, then just leave the line commented, as it is in the supplied configuration notecard.

Let's examine now the TP = lines from the supplied [Black Tulip] Simple Teleport System ~CFG~ configuration notecard:

TP = tp|0|Casablanca Estates|193|112|25|0
TP = tp|1|Casablanca Estates|215|150|35|0
TP = tp|2|Casablanca Estates|185|170|26|0
TP = tp|3|Casablanca Estates|204|90|35|0
TP = tp|4|Casablanca Estates|225|148|25|0
TP = tp|5|Casablanca Estates|199|168|36|0
TP = tp|6|Casablanca Estates|124|126|22|0
TP = tp|7|Casablanca Estates|167|172|25|0

If we count the TP = lines, we see that we have EIGHT of them. This means that the panel object will hold eight different locations.

The first line says:

TP = tp|0|Casablanca Estates|193|112|25|0

This means: When we click on the prim with description tp, the face number 0, we will be offered to teleport to Casablanca Estates region, position X = 193, Y = 112, Z = 25, and everybody will get this menu, for the access is set to 0, in the last field.

The second line says:

TP = tp|1|Casablanca Estates|215|150|35|0

This means: When we click on the prim with description tp, the face number 1, we will be offered to teleport to Casablanca Estates region, position X = 215, Y = 150, Z = 35, and everybody will get this menu, for the access is set to 0, in the last field.

and similarly, we can now understand what the other lines mean.

If we had another prim with description, for example, tp1, we could add more lines like:

TP = tp1|0|Casablanca Estates|215|140|25|1

which would mean, when we click on the prim with description tp1, the face number 0, we will be offered to teleport to Casablanca Estates region, position X = 215, Y = 140, Z = 25, and only those with their group tag on would get this menu, for the access is set to 1, in the last field.

REMEMBER: *YOU* decide what description you want to give to your prims, and then you use those descriptions in the configuration notecard.

IMPORTANT: Do not use the = character in the description of the prim, and do not leave spaces around the | characters of the notecard. Be particularly careful with possible spaces at the end of the lines, for those are easily unnoticed.

If you ever lose your configuration notecard, your documentation has an embedded copy.


SETUP: THE CONFIGURATION NOTECARD - HOW TO OBTAIN THE REGION DATA


Let's take as an example the landmark included with your purchase.

In your inventory, right click on it and select the Show on Map option. This opens the world map, showing you a red circle highlighting the location. To the right, you have some information:


Highlighted, there's the name Casablanca Estates followed by a Find button. Casablanca Estates is the region name. We would write it exactly that way. Then, under Location, we see three numbers. They correspond, respectively, to the X, Y and Z position of the destination location. So 171 would be the number to write down for X, 128, the number for Y, and finally, 25, the number for Z.


SETUP: DROPPING THE SCRIPT AND NOTECARD


Now that the configuration notecard is ready, this is how we have to proceed:

  • Right click the LINKED panel object to Edit it.
  • Do NOT tick Edit Linked. This is to ensure that script and notecard will go to the root prim.
  • Click the Content tab of the Edit window.
  • Drag from your inventory and drop on said Content tab the [Black Tulip] Simple Teleport System ~CFG~ notecard.
  • Now, drag from your inventory and drop on the Content tab the [Black Tulip] Simple Teleport System script.
  • Close the Edit window.

You will see a message show up in your local/nearby chat window telling you when the script is ready.

If you need to change/add/remove locations, you can edit the notecard inside the object, or delete it, then edit the notecard in your inventory and drag and drop it again.


TROUBLESHOOTING


Q: The script does not recognize the name I have given to the teleport prims. What happens?

A: Make sure you have written the name in the DESCRIPTION field of the prims. If you use the Name field, the script will not know those are your teleport points.


Q: I have double-checked: I've written the names in the DESCRIPTION field of the prims, but the script does not work. What's wrong?

A: Make sure that name coincides exactly with the one you write in the notecard lines. Careful with spaces at the end of the description field, for those would go unnoticed.


Q: My customers say that they get the menu and click on the teleport link, but they're not teleported to the exact location. What's happening?

A: Make sure that the Teleport Routing setting of the land properties for that destination is set to ANYWHERE.


Q: I have a customer telling me that no link shows on the menu. What's wrong here?

A: It could be that your customer is using a way outdated viewer. They should update their viewer, but in any case, they also receive in local chat a link that they can click to teleport to the destination. Let them know about this.


For any other problem not described here, please give a complete description of your issue in the customer service online form. I'll get back to you after I have read your report and replicated your issue inworld, according to your description of it. Please, be detailed.

-- Auryn Beorn